Hi, it’s great that you’ve decided to switch to a fully managed rojo workflow!
I’ll break this post down into 3 parts - terminology, setup steps, and an explanation of the general workflow once you have a fully managed project.
Terminology
- Datamodel : a fancy word for “the stuff inside your place file” - Roblox services, your maps, etc etc.
- Repository : Your git repository
- rbxmx file : Roblox XML format model file, these are files generated from studio when you click “save to file…”, they’re a model file that contains roblox objects (kind of like FBX files, except these model files can store ANY roblox object in any hierarchy)
- File system : The files in your repository
- cmd : The windows command prompt
- cd : The
cd command in cmd, aka “change directory”
Setup steps
First things first - storing assets on the file system. In a fully managed workflow, all of your game’s “assets” (maps, meshes, UI objects, etc etc) are stored somewhere in your repository (traditionally under Repository/Assets), along with your code source files.
When converting already existing projects that are partially managed, you need to pull all of the ‘asset’ Roblox objects from the datamodel into rbxmx files on the file system. If your projects are anything like mine, you probably have a ton of models, UIs, etc in your datamodel. Saving these by hand by clicking “save to file…” on every single object in the game would be incredibly time consuming. It would make sense to do a bulk export to the filesystem! This is where remodel comes in. Remodel allows you to run lua code that manipulates a place file’s datamodel. You can write to model files, place files, shuffle data between them, write to published models & places, and more. It’s mostly just a tool to shuffle data around between various different roblox data storage formats. In our case, we’ll be pulling objects from your place file into rbxmx files stored on the filesystem. First things first, let’s install remodel.
Installing remodel
Installation steps
There are a handful of different ways you can install remodel. You could use foreman, which makes managing different versions of tools in the rojo toolchain easier. But, for the sake of simplicity, we’ll just do a global install of remodel in a few simple steps (assumes you are using Windows 10):
- Create a folder named “Bin” at the root of your
C: drive.
- Add
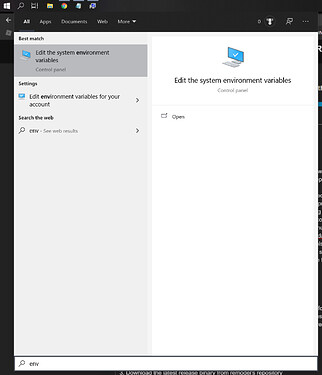
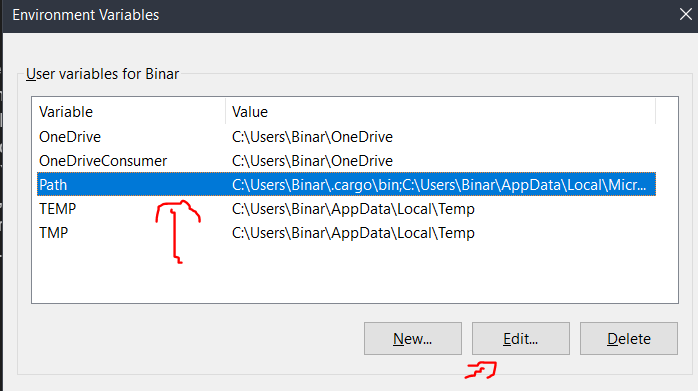
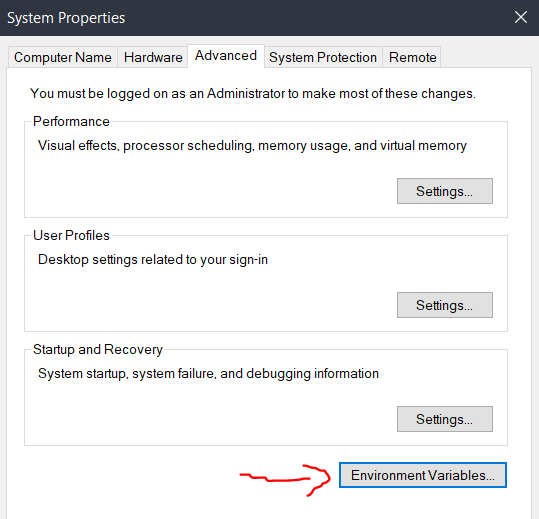
C:\Bin to your computer’s PATH environment variable:
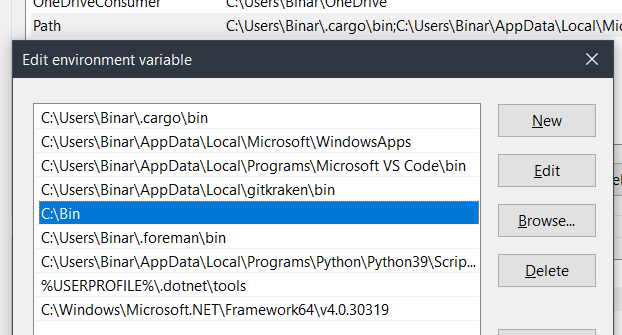
3. Download the latest release binary from remodel’s repository
4. Move the remodel.exe file into your C:\Bin folder
Extracting the objects from the datamodel
Now that remodel is installed, we need to run the remodel script to pull assets from the datamodel into your file system as rbxmx files! Chuck this lua script into the root of your repository:
PullAssets.lua
function splitstring(inputstr, sep)
	if sep == nil then
			sep = "%s"
	end
	local t={}
	for str in string.gmatch(inputstr, "([^"..sep.."]+)") do
			table.insert(t, str)
	end
	return t
end

local function GetInstanceFromDatamodel(Datamodel,StringPath)
	local CurrentObjectReference = Datamodel

	for _, ObjectName in pairs(splitstring(StringPath,".")) do
		if CurrentObjectReference:FindFirstChild(ObjectName) ~= nil then
			CurrentObjectReference = CurrentObjectReference[ObjectName]
		else
			error(ObjectName.." was not found.")
			return nil
		end
	end

	return CurrentObjectReference
end

local function SaveAssetToFilesystem(Asset,Path)
    for _,Instance in pairs(Asset:GetChildren()) do
		if Instance.ClassName ~= "Folder" then
			remodel.writeModelFile(Instance,Path.."/"..Instance.Name..".rbxmx")
		else
			remodel.createDirAll(Path.."/"..Instance.Name)
			SaveAssetToFilesystem(Instance,Path.."/"..Instance.Name)
        end
    end
end

local Datamodel = remodel.readPlaceFile("YourPlaceFileHere.rbxlx")
local Pullfrom = GetInstanceFromDatamodel(Datamodel,"ServerStorage.Assets.Maps")
local Saveto = "../Assets/Maps"

SaveAssetToFilesystem(Pullfrom,Saveto)
Now, from here, you’ll be repeating the next few steps in a loop until all of your game’s assets have been pulled from the datamodel.
- Save your place file somewhere in your repository as an
rbxlx file (XML place file). Open cmd and cd to the root of your repository
- Edit the bottom of the remodel script to point to the relevant object in the datamodel that you wish to recursively pull & save to the filesystem
- Run the command
remodel run PullAssets.lua
- Repeat steps 1 & 2 until the entire game’s assets are on the filesystem
Once these steps are done, try doing a rojo build of your game and checking to make sure everything is what it should be in the generated place file. Test your game to make sure the code works, nothing is out of place, etc etc. You will need to edit your *.project.json file to map the assets into the correct places in your datamodel. If everything works, awesome! You are now fully rojo managed and can make full use of git branches, pull requests, semantic versioning, the whole nine yards. You can even automate more things now to save time depending on the size of your team!
General workflow
Now that your project is all fully rojo managed, let’s talk about the general workflow you’re going to be going through. Keep in mind that the information here is pretty generalized, the actual specific details of your workflow are going to vary from project to project & team to team, depending on the needs of them.
Generally speaking, your general workflow will be these steps:
-
rojo build / run a build script to generate your place file
- Open your place file
-
rojo serve *.project.json & click “connect” on the rojo plugin in studio
- Write code in your preferred external editor like normal. Test, debug, etc etc just like you would in a normal studio session. While doing this, be sure to make occasional self-contained granular commits in git, and be sure to push to origin occasionally!
In terms of branching, nothing has really changed much - whenever you go to make a feature or patch, make a new branch and implement that feature/patch on that branch. The only difference from partially managed to fully managed is, now all of your game’s objects/assets are tracked by version control too! Now whenever you switch branches, you don’t have to worry about shuffling objects around the datamodel, git handles that for you! This makes working with larger teams feasible without hours of headache & logistical issues. This is one of the biggest reasons to be fully rojo managed - it makes your project scalable to over 10, even 100 team members! By being partially managed, you’re essentially using external tools such as git with one hand tied behind your back.
If you have 2 people working on the same asset in 2 different branches, you’ll end up with a merge conflict. From there, you can either manually fix it by going into studio, inserting both versions & manually combining them into a new, 3rd model - or you can just simply use the “ours or theirs” git merge strategy - discarding one, keeping the other. Even though model files are being stored in XML, they should be treated as binary blobs - they shouldn’t be fused together at the file level, doing so will cause data corruption.
There’s a lot of information about workflows with fully rojo managed projects. Too much to cover here, in fact. But overall, this is a small sample of what kinds of benefits you get by being fully managed.
Hope this helps! 


