

This article is a stub; I’m currently in the middle of writing further sections. Please let me know what you think so far though!
Rationale
Many of us here run a lot of infrastructure that is external to Roblox that enables us to run high power operations, for example external databases, statistics, Discord integrations and a bunch of other relatively critical operational services. For all but the largest and most professional organisations, these often run in extremely insecure environments with little access control, no automation or pipelining which both cause scaling issues, security woes and forces you to focus valuable development time on maintaining ancient infrastructure.
Tell me if any of this sounds familiar:
- DigitalOcean / Linode

- Running Ubuntu 16

- SSH into the box as root when you want to interface with it

- Running
git pullevery time you do an update
Don’t fear though! This doesn’t have to be the way - by the end of this tutorial you’ll be able to confidently (!?) do the following:
- Have a secure, multi account environment on Amazon Web Services (“AWS”) which will allow you to manage your developers access granularly, and revoke / grant permissions at a moments notice
- Enable an automatic “DevOps” pipeline to publish your changes as soon as you commit them to your repository

- Migrate your VPS based hosting solution to a much cheaper and more secure “serverless” approach


What is AWS?
Amazon Web Services (“AWS”) is Amazon’s public cloud hosting offering - they allow you to use services they have developed for themselves, and hosted on their servers in their datacentres. This provides you with four key “benefits”:
- Trade capital expense for variable expense (AWS bills you for what you use, not provisioned capacity; You don’t have to pay upfront for a dedicated server, which lowers the investment cost)
- Benefit from Amazon’s economy of scale (AWS has already spent millions of dollars on R&D, and they have so many customers that buying equipment in bulk for them is cheaper for them than it would be for you to buy the same equipment)
- Stop guessing about capacity (Automatically scale your infrastructure and only pay for what you use - if your game explodes overnight, you don’t have to do a thing!)
- Increase your agility (you can deploy stuff way faster with a DevOps mindset)
To continue in this tutorial, you’ll need an AWS account - this is separate from your Amazon.com account, so make it now.
protip: use your real information, or Amazon might hold your account for suspicious activity - they do this to prevent malicious users
Case Study
So that you can understand why this is actually going to be useful for you on a day-to-day basis, I’m going to include the following scenario that we’re going to be problem solving for.
Emily is a senior developer at Generico Entertainment LLC, a Roblox development studio who produces a relatively (~500 concurrent) popular game. She has a team of 4 developers, 2 of which do infrequent updates to their current Discord bot infrastructure. She has to develop some external infrastructure to support her rapidly growing player base, and the studio creative directors are planning a massive update which requires her to do the following:
- Create a Discord bot that allows users in their Discord server to view how many
Coins they have to spend in the game
- Create an external database that handles all of the in-game currency
- Create a secured Web API that allows her game servers to query, and update the in game currency of users
So, without further ado, let’s get cracking!
Setting up AWS
Approximate Cost: $0.033  (Source)
In order to facilitate the multi-account use case, we’re going to use a service called AWS Organizations.
AWS Organizations helps you centrally manage and govern your environment as you grow and scale your AWS resources. Using AWS Organizations, you can programmatically create new AWS accounts and allocate resources, group accounts to organize your workflows, apply policies to accounts or groups for governance, and simplify billing by using a single payment method for all of your accounts.
In addition to AWS Organizations, we’re going to use the AWS Scaffolding tool known as Control Tower to create all of the environmental stuff that we need to securely manage our infrastructure.
CRITICAL WARNING - The account that you just made for AWS is what is known as your “Root” account; this is a very important account however you should not routinely log into it. This is because it is a single point of failure that, if compromised, will lead to the failure of all of your other security controls. You should also immediately enable two factor authentication. You can do so here: IAM Management Console (amazon.com). Please do so before continuing!
- Open Control Tower - you can go to the Wizard by clicking here
- Select the Region that you want to work in - if you’re not fussed about it, choose
eu-west-1if you’re based in the EU,us-west-1if you’re in the US, orap-northeast-2if you’re based in Asia. It really doesn’t matter though for most use cases, just do some research to make sure the services you plan on using are available where you plan on selecting. You cannot change this once you do it! - Add other governance regions as appropriate. Click Next
- You can change your Foundational OU / Additional OU names. These aren’t important, and the standard ones are more than suitable. Click Next
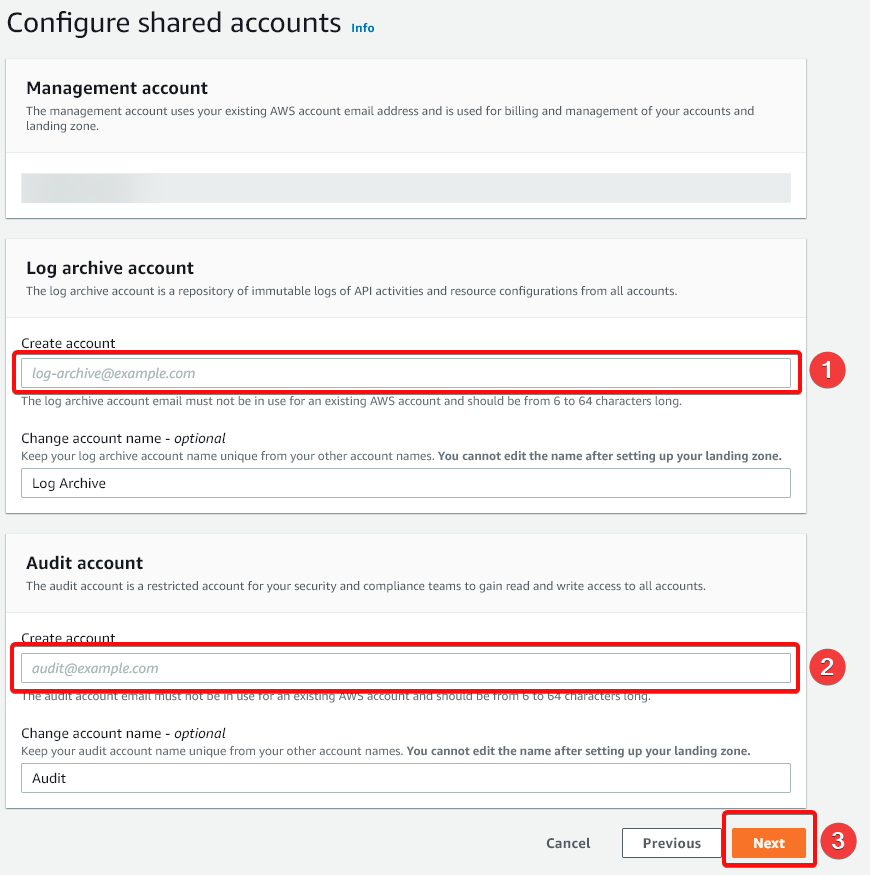
- Enter an email address for your Log archive account (
 ), and Audit account (
 ) - ideally, you should own the email domain used, and call them something sensible (i.e.
 [email protected]). These are used for auditing and logging so that someone can’t tamper with your environment logs. Click Next ( )
) - Review your options, and when you’re happy check the acceptance checkbox and click Set up landing zone

Congratulations! You’re through the first stage, and Amazon is now creating all of the resources for your environment. This normally takes about an hour, so go out and grab a bite to eat or watch some Seinfeld whilst you wait. 


…60 minutes later

Your landing zone is complete!
You can find the URL for your landing zone under Users and access on the side bar. (Or click here: AWS Control Tower (amazon.com))
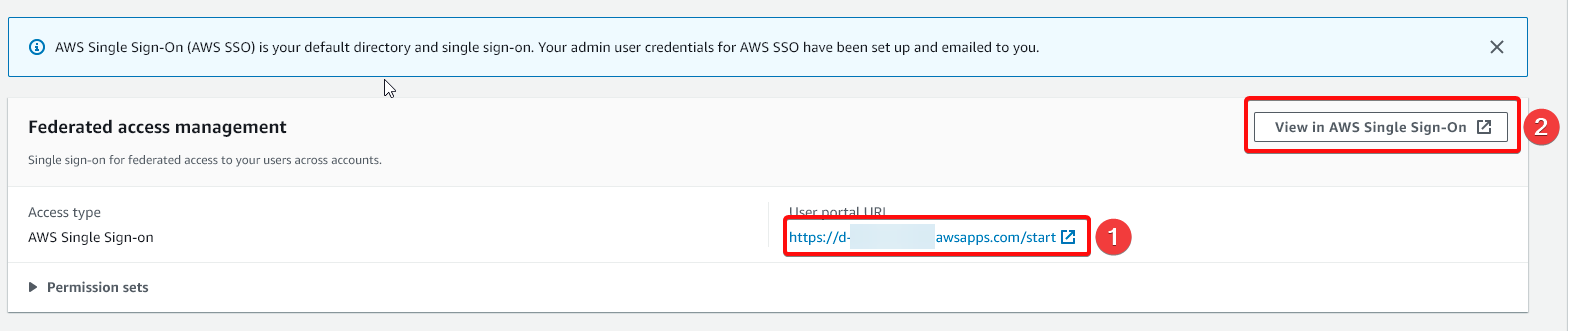
- You can visit your SSO URL by navigating to
- You can customise your SSO URL by navigating to , scrolling down and selecting
Customizenext to the SSO URL inside of AWS SSO (click this to go there)
You will also have received an email inviting you to join your AWS SSO area. It is important you do this, and use that account for your future access. You should not use your root account for the following steps, and in fact some of them (i.e. generating environment accounts) will cause errors if you do. This is best practice anyway.
Now we’ve created the structure that will allow you to interact with your AWS environment, we can create some accounts for Emily and her colleagues.
Creating User Accounts
Approximate Cost: Nothing!  (Source)
There is a weird quirk that is involved with AWS Control Tower, in that “Accounts” are not things that users log into - instead, they’re environments that you can create resources in. Think about them like a Game experience, where they’re isolated from other experiences. You get used to it, I promise!
Instead, “Users” are what people log into. They’re controlled by AWS Single Sign-On (“SSO”) and that is how you have to interact with them. So, let’s go through the process of creating new users!
-
Enter AWS SSO and select Users → Add User
-
Enter in the correct credentials for your user - I’d recommend using their Roblox username as the Username and as their Display name too. If your studio is comfortable with real names, then I’d use that instead. It doesn’t really matter though!
- For their email, make sure you use an email they actually own. If you have a domain, I’d recommend you use that one.
-
Click Next: Groups - You don’t have to add any groups, and in fact I’d only do this if you trust the user to have those permissions across all of the different environments you own. After you create the user, you can then assign them access to individual environments later. Once you’re done, select Add user.
You’ve now created a user, and they’re automatically sent their details to log into your environment with!
Creating Environments (“Accounts”)
Approximate Cost: $0.031/acc (Source)
As described above, AWS “Accounts” are not things that users log into, they’re environments that you can create stuff in. Don’t blame me, blame Amazon for this one…
Anyway. To create this account, you need to be logged into your AWS SSO portal under the root account that you created earlier (the one that you got sent an email to set up and add a password to) - you can identify this environment as it will have the name of your root user. I’ve highlighted it here.

To log into that environment, you need to click it, and Click Management Console next to AWSAdministratorAccess. This will give you all of the permissions to do administrative tasks in your environment.
- Navigate to Control Tower (in the correct region) → Account Factory
- Select Enroll Account in the top right
- Populate the form according to your specifications

-
- Specify an email that is unique to that account, preferably with a domain name that you own. For example, if you were making an account to host your Discord bot, call it
[email protected] -
- Specify a readable Display name - i.e.
Discord-Moderation-Bot.prod -
- Specify this as the same as what you put in
-
 &
&  - Up to you, but I’d normally put the Name in (i.e.
 DiscordModerationBot) and the environment in (i.e. Prod) - Click
 when you’re happy
- This account will take about 20 minutes to provision fully. You can track its progress by clicking on the
AWS Service Cataloghotlink in the blue ribbon at the top of the page. - Once it is done, it’ll appear under your AWS SSO Portal!


Assigning Users to Accounts
Approximate Cost: Nothing! (Source)
Now we’ve made a user, and made an account that we could add that user to. So, let’s go ahead and do this!
- Navigate to AWS SSO → AWS Accounts
- Click the Account name you want to add the User(s) to
- Click Assign Users
- Select the User(s) you want to add, and click Next: permissions sets
- Select the Permissions you want to assign to that user.
- I’d highly recommend that you only give Users the minimum permissions that they need - if they don’t need write access, then only give them
AWSReadOnlyAccess. Generally, if a user needs write access, you should give themAWSPowerUserAccess. You should make more granular roles for accounts which aren’t user owned, i.e. Service Accounts.
- I’d highly recommend that you only give Users the minimum permissions that they need - if they don’t need write access, then only give them
- Review, and click Finish - Congratulations!
Elastic Container Service (“ECS”) & DevOps
Approximate Cost: $5-33/mo based on resource size (Source)
Now we’re onto the slightly more complicated stuff - setting up infrastructure. We’re going to be using containers as they’re generally preferable to hosting a VPS-style instance (such as EC2) from both a cost and security point of view.
Elastic Container Service (“ECS”) is a very flexible service that allows you to host containerised services, such as Docker containers, in such a way that they don’t have any underlying infrastructure you have to worry about. We’re going to be using the Fargate flavour of ECS, which just means that they are “serverless” (you can go for more traditional options, if you so require).
We’re also going to set up a DevOps Pipeline that will link up to your GitHub repository and automatically push changes to your container services as soon as you make them. This gives you a “zero click” deployment solution; you don’t have to touch your infrastructure at all to change things.
We’re going to use the following “Code deployment” services from Amazon (they all integrate together, so don’t get too fussed over it. It’ll make a lot more sense in a bit!):
- CodeBuild to build the Docker containers and push them to EC2 Container Repository (“ECR”)
- CodeDeploy to deploy the Docker containers to ECS Fargate
- CodePipeline to stitch all of the stages together, and fetch the Source from GitHub
Here is a diagram of what we’re building:
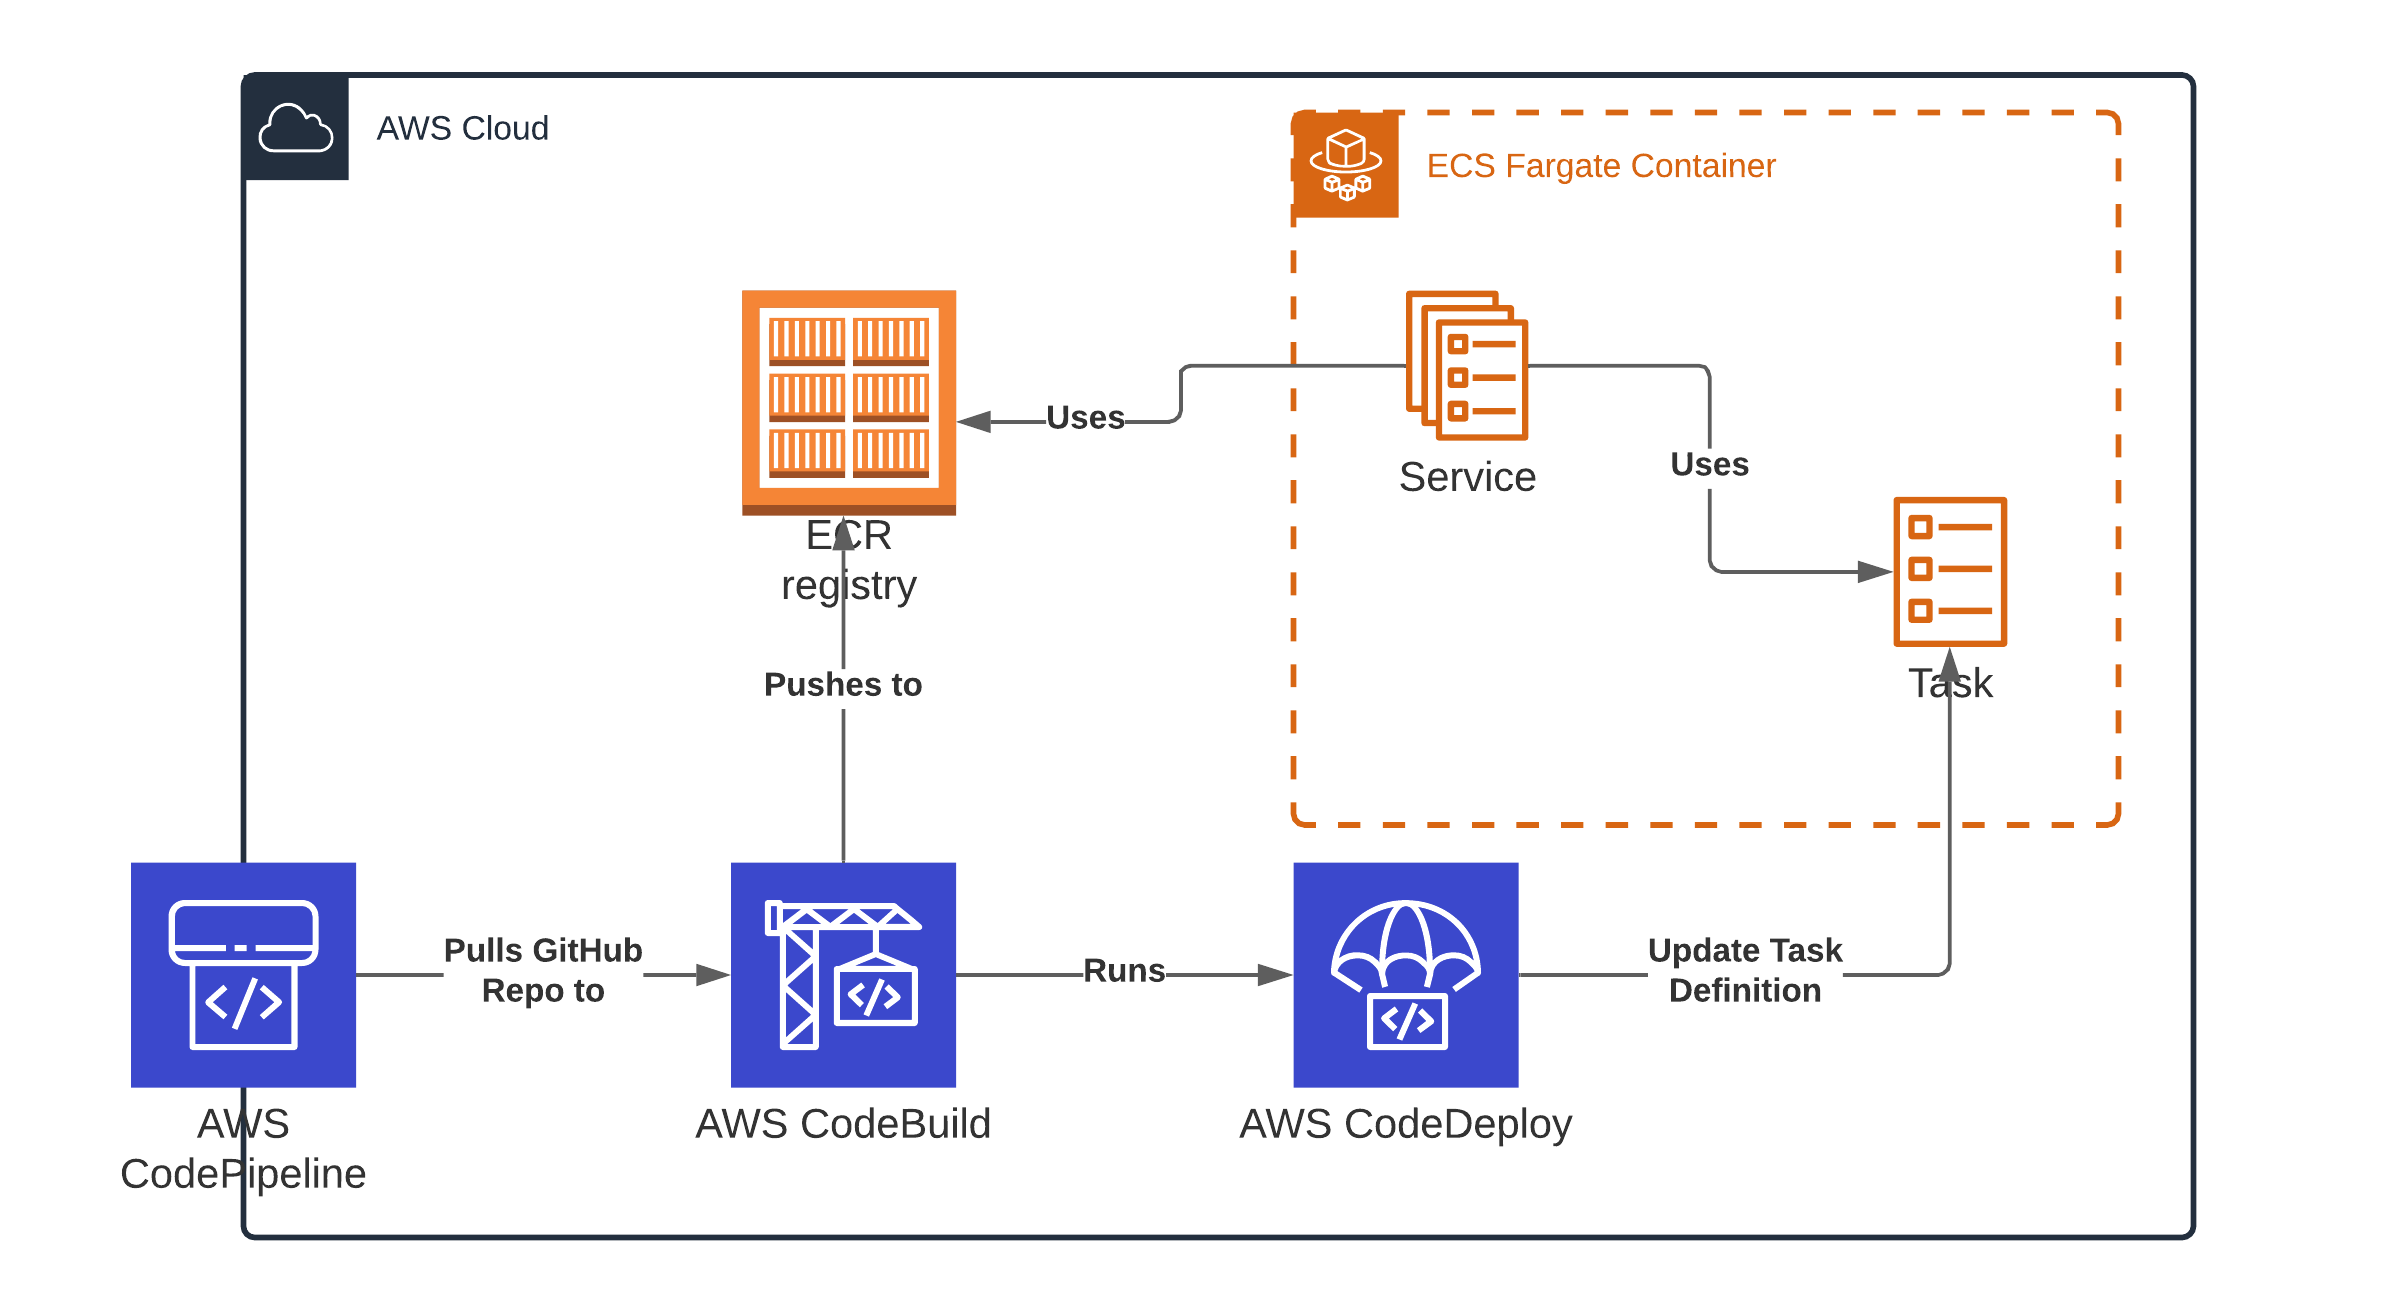
 How complicated! How on earth will I achieve all of this!
Well fear not, inner monologue. I’ll walk you through step by step! It’ll only take ~10 minutes (I promise - time it!)
iam:CreateServiceLinkedRolepermission to actually do this. Make sure you give your accountAWSAdministratorAccessin the environment you’re doing this in, or the Service Linked role will not be created properly!
Step 1. Create ECR Repository & Upload Image 
You need to create a repository that will hold the Docker image of your web server - I’ve created a demo for how you can do this with Docker, Node.js and Express.js:
Feel free to download it! You can do this by clicking Code → Download ZIP or running git clone.
You also should download the following tools to help you with this tutorial:
- Docker - Empowering App Development for Developers | Docker
- amazon-ecr-credential-helper - Releases · awslabs/amazon-ecr-credential-helper (github.com) (Install guide in the repo)
- Python 3 - Download Python | Python.org
- AWS CLI - AWS Command Line Interface (amazon.com)
We are first going to create an ECR repository - we’re going to call it hello-world-repo (and where you see hello-world-repo, that is where you put your ECR repo name if you choose to change it.
Navigate to ECR (or click here), click “Get Started” / “Create repository” and create a private repo called hello-world-repo. Leave the other options off and click Create repository.
Now, go into where you unzipped / cloned the repository and open PowerShell / your command line. Make sure you’re cd’d into the folder where the repository is.
Now you need to input your current credentials into AWS CLI.
Run the following command: aws configure - A menu will appear. You can find the information you’re looking for under your SSO Portal → The Account you’re using → The Role you’re going in as → Command line or programmatic access (And then under “Option 3”)

Once you’ve configured your AWS credentials, run the following:
-
aws ecr get-login-password --region <**region**> | docker login --username AWS --password-stdin <**aws_account_id**>.dkr.ecr.<**region**>.amazonaws.com(Replace <region> with your region code, i.e.eu-west-1, and replace <aws_account_id> with your account ID)
You can find your Account ID here:

- Make sure there is no error - it should just say “Login succeeded”
![]()
- If there is an error, try the following:
- Update Python, AWS CLI and Docker
- Ensure Docker is Running
- Make sure your credentials are valid - try deleting the
C:\Users\<You>\.aws\credentialsfile
- Run
docker build . - If it builds successfully, run
docker imagesand select the image id of the top image (that you just built) - Run
docker tag <**image id**> <**aws_account_id**>.dkr.ecr.<**region**>.amazonaws.com/hello-world-repo(Replace <image id> with the image id you got in step 4, <region> with your region code, i.e.eu-west-1, and replace <aws_account_id> with your account ID) - Run
docker push <**aws_account_id**>.dkr.ecr.<**region**>.amazonaws.com/hello-world-repo
Success! You now have an ECR image. You can navigate to it by going to ECR → Repositories → hello-world-repo → Images → latest
Remember that your Image URL is <**aws_account_id**>.dkr.ecr.<**region**>.amazonaws.com/hello-world-repo:latest. You’ll need this in Step 2!
Step 2. Create ECS Service 
ECS Follows the following pattern:
- You have a Cluster, which holds all of your
-
Services, which holds all of your
-
Tasks, which are basically your containers!
-
Tasks, which are basically your containers!
-
Services, which holds all of your
Why is it so convoluted? Well, ECS is designed to scale really well - so, it has almost infinite complexity baked in. You could have 20 odd clusters, which all have hundreds of services, each running dozens of tasks. What we’re doing here is wayyy low on the ECS engineering scope.
Brief Networking Bit
We need to give your ECS clusters a route to connect to the internet through - you can do this by going to VPC → Internet gateways → Create internet gateway
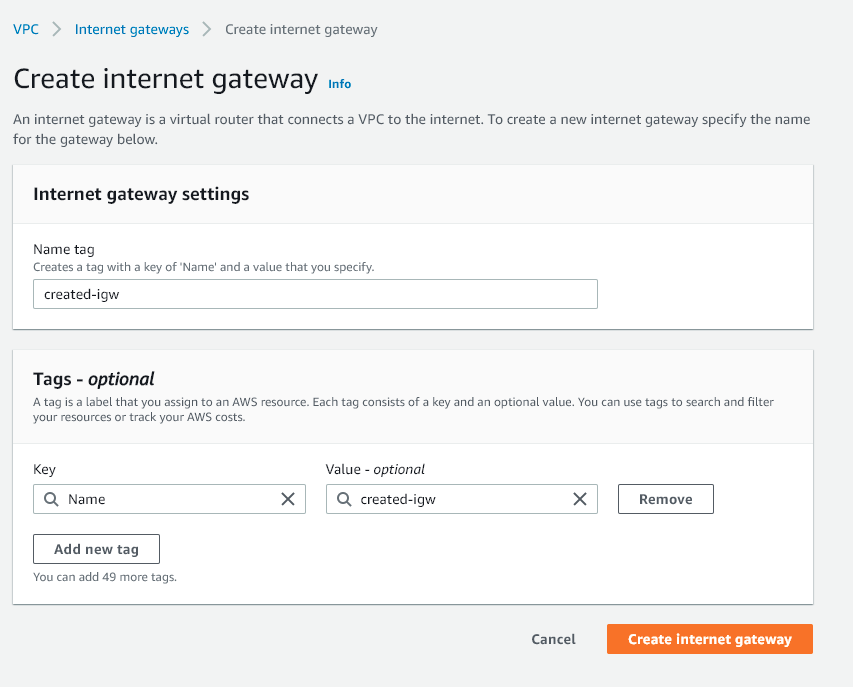
Once you create it, click Attach to VPC and attach it to your default VPC. You now have internet access available to that VPC.
Now, you need to route to that gateway. This is how you do that:
- Navigate to VPC → Route Tables
- Go through every single Route Table in the default VPC (if it’s a fresh account, that’s all of them)
- For each of them, click them and go to Routes → Edit Routes
- Add a route to destination
0.0.0.0/0, with the Target ofInternet Gateway(and then select your internet gateway when it pops up. Click Save changes and repeat for the other route tables.
 Breathes frustrated sigh now you’re done! No more of that fuss again…
Let’s get cracking. Navigate to ECS in your environment, and make sure you enable “New ECS Experience” so you can follow along with what I see (plus it’s a slightly less awful UX).
-
Select Clusters → Create Cluster
-
Under “Select cluster template”, choose Networking only (top left) and click Next step
-
Call your cluster something sensible; I’m going for “TestCluster”. Do not check “Create VPC”. Do enable CloudWatch Container Insights (not a must, but it’s nice
) -
If you’re happy, click Create → if it isn’t successfully, check your permissions and try renaming it. If that is still broken, try troubleshooting by checking out this guide
-
You have now successfully created the Cluster. We’re now going to create the Task Definition (defines what Tasks are created for each service)
-
Expand the Left hand menu and select Task definitions → Create new Task Definition
-
Select FARGATE, and click Next step
-
Choose a suitable Task definition name, i.e. “TestDefinition”
-
For task role, select ecsTaskExecutionRole (if it doesn’t exist, make it: Amazon ECS task execution IAM role - Amazon Elastic Container Service)
-
Scroll down to Task Size, and select the lowest values for both Memory and CPU (0.5GB, 0.25 vCPU).
-
Under Container Definitions, select Add container
- Enter an appropriate Container name
- Under Image, enter your image url from Step 1
- Leave everything else blank and click Add
-
Leave everything else blank, and click Create
- If there is an error, make sure you have the
AWSAdministratorAccessrole (AWSPowerUserAccessdoesn’t cut it here, since it creates IAM Roles)
- If there is an error, make sure you have the
-
Now, we’re going to make the Service. Go back to your cluster, scroll down on the page and select Deploy under “Services”

- Leave the settings as they are, name the Service something sensible i.e. “TestService” and under Family select your Task definition name and LATEST revision.
- Go to Networking, and select the default VPC, choose all three subnets, and choose the default Security Group. Once happy, scroll down and click Deploy. Grab a cup of tea, as this will take a few minutes to run!